

How To Capture and Edit Bird Pictures

I love to seek out and take pictures of birds. Over the years I’ve literally captured 1000s of images of our feathered friends. I’ve developed a few rules of thumb that work for me, they might help you too …
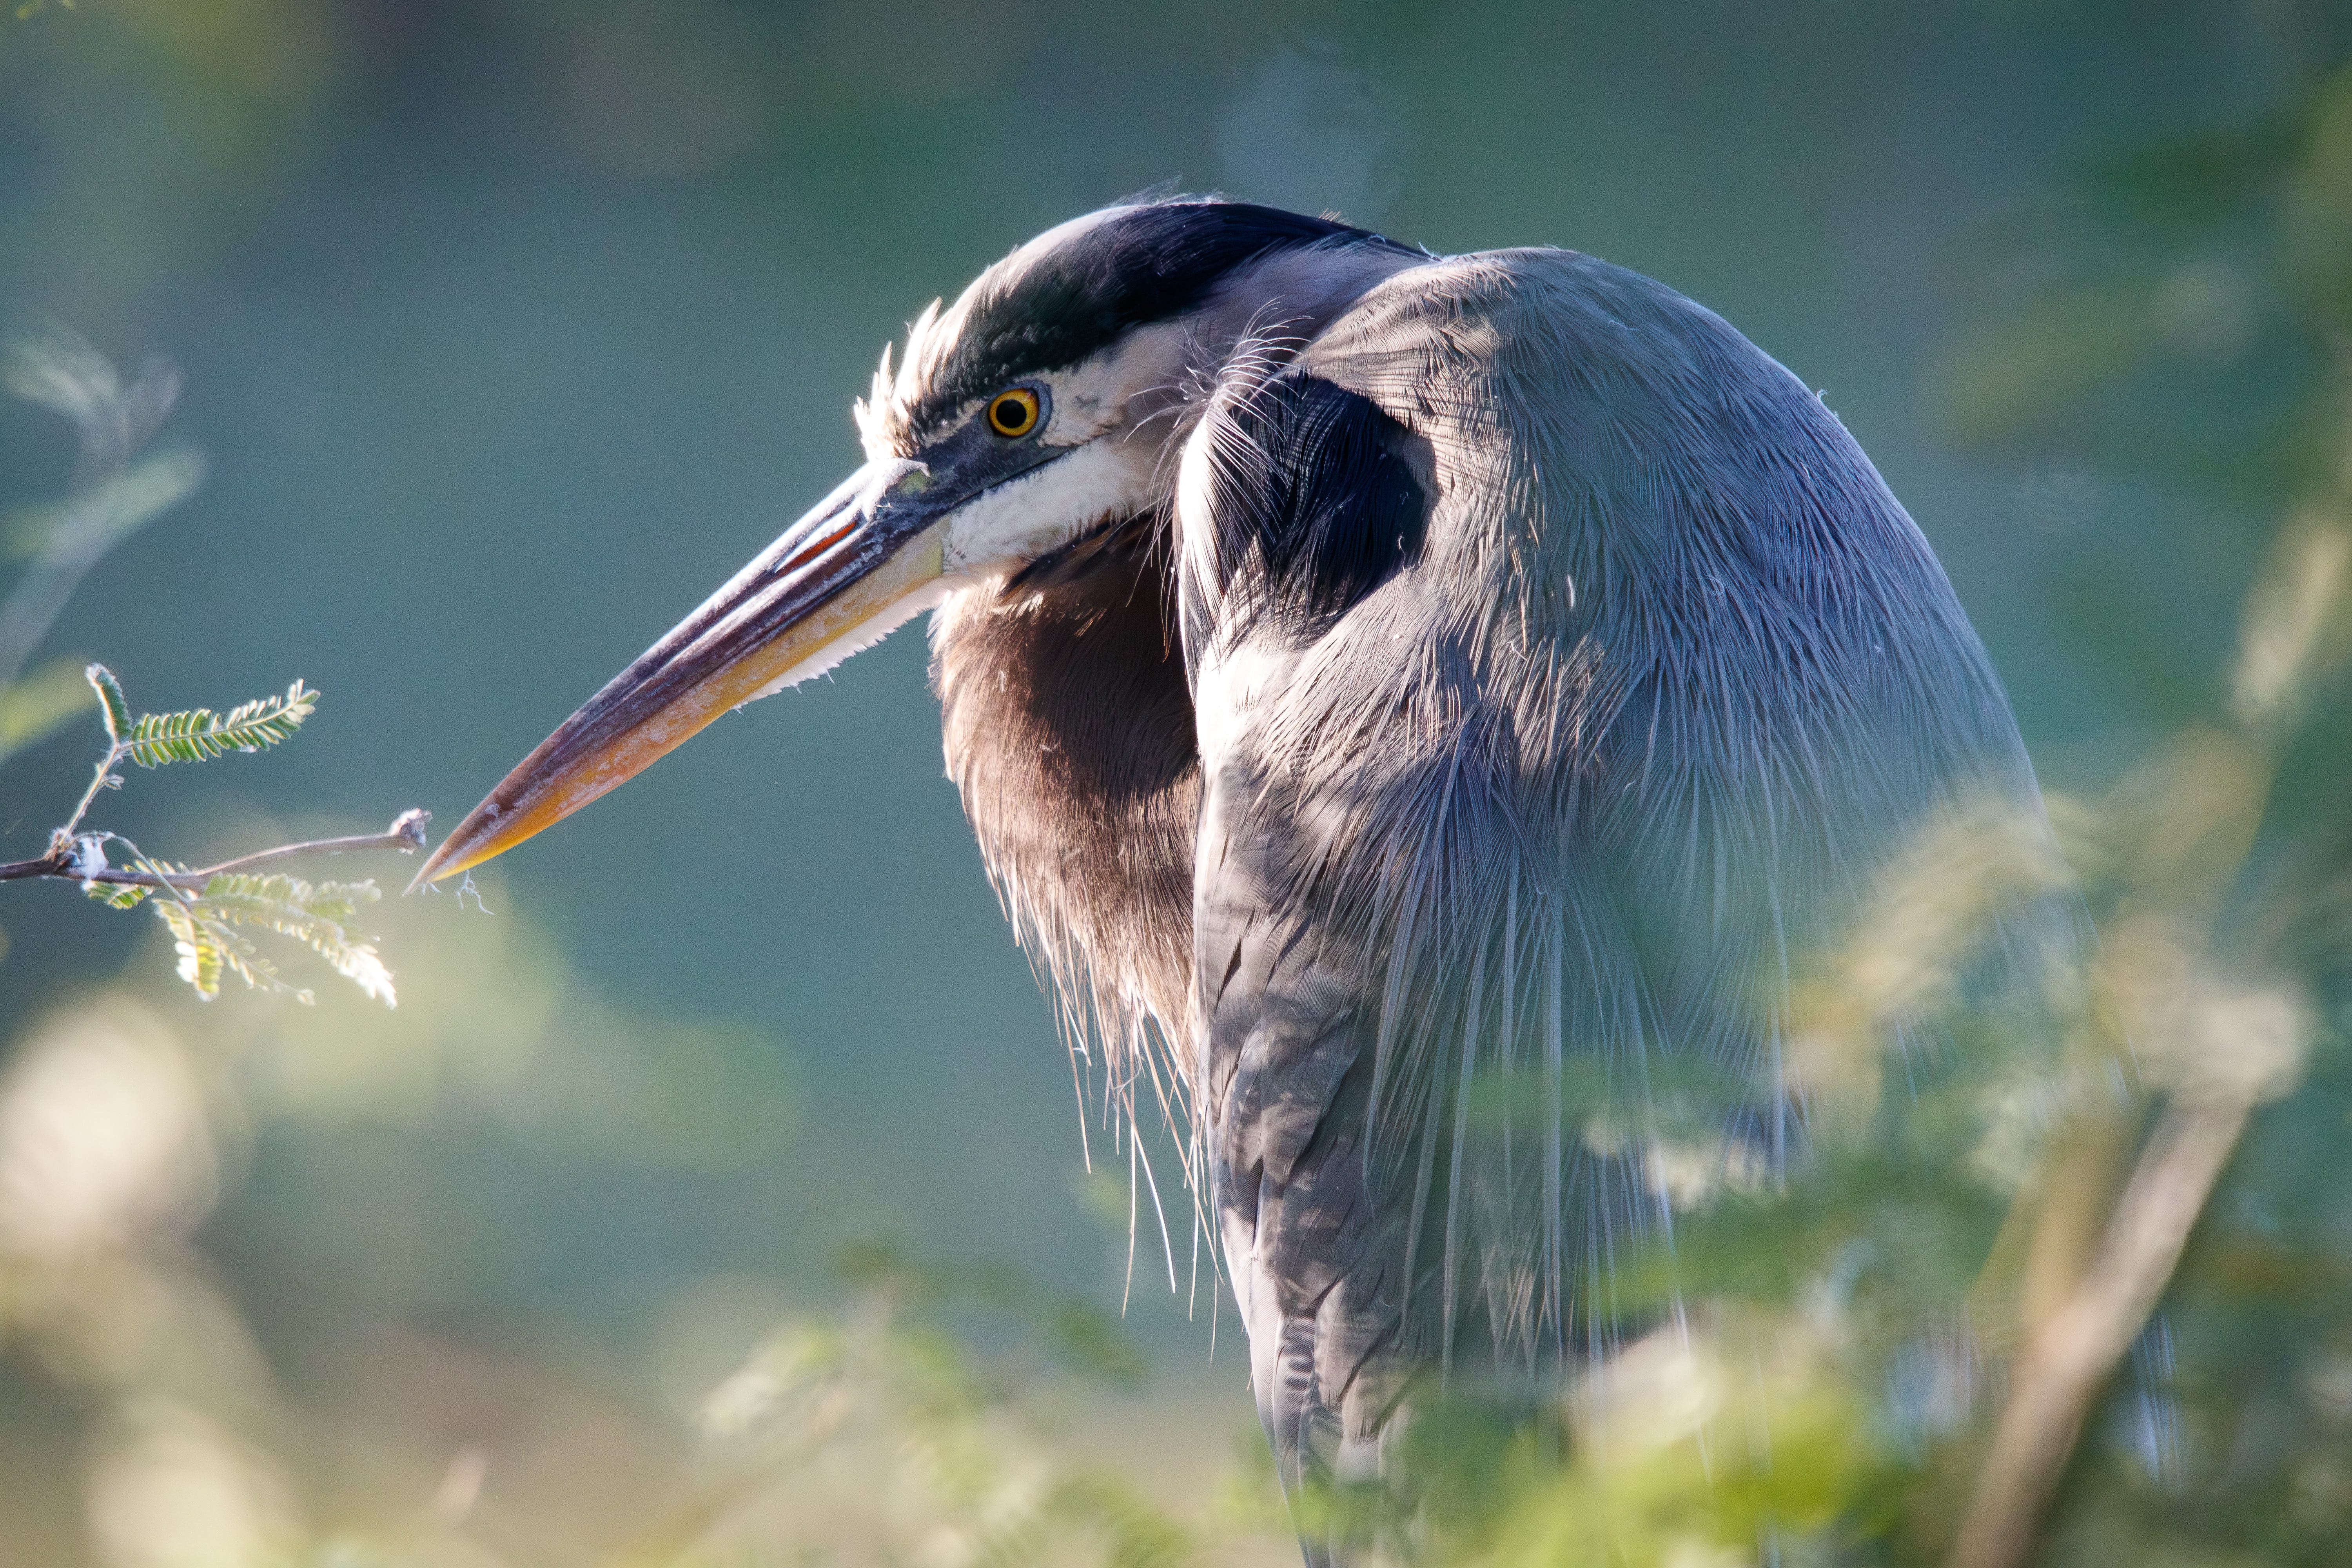
Best settings for birds in trees and among branches:
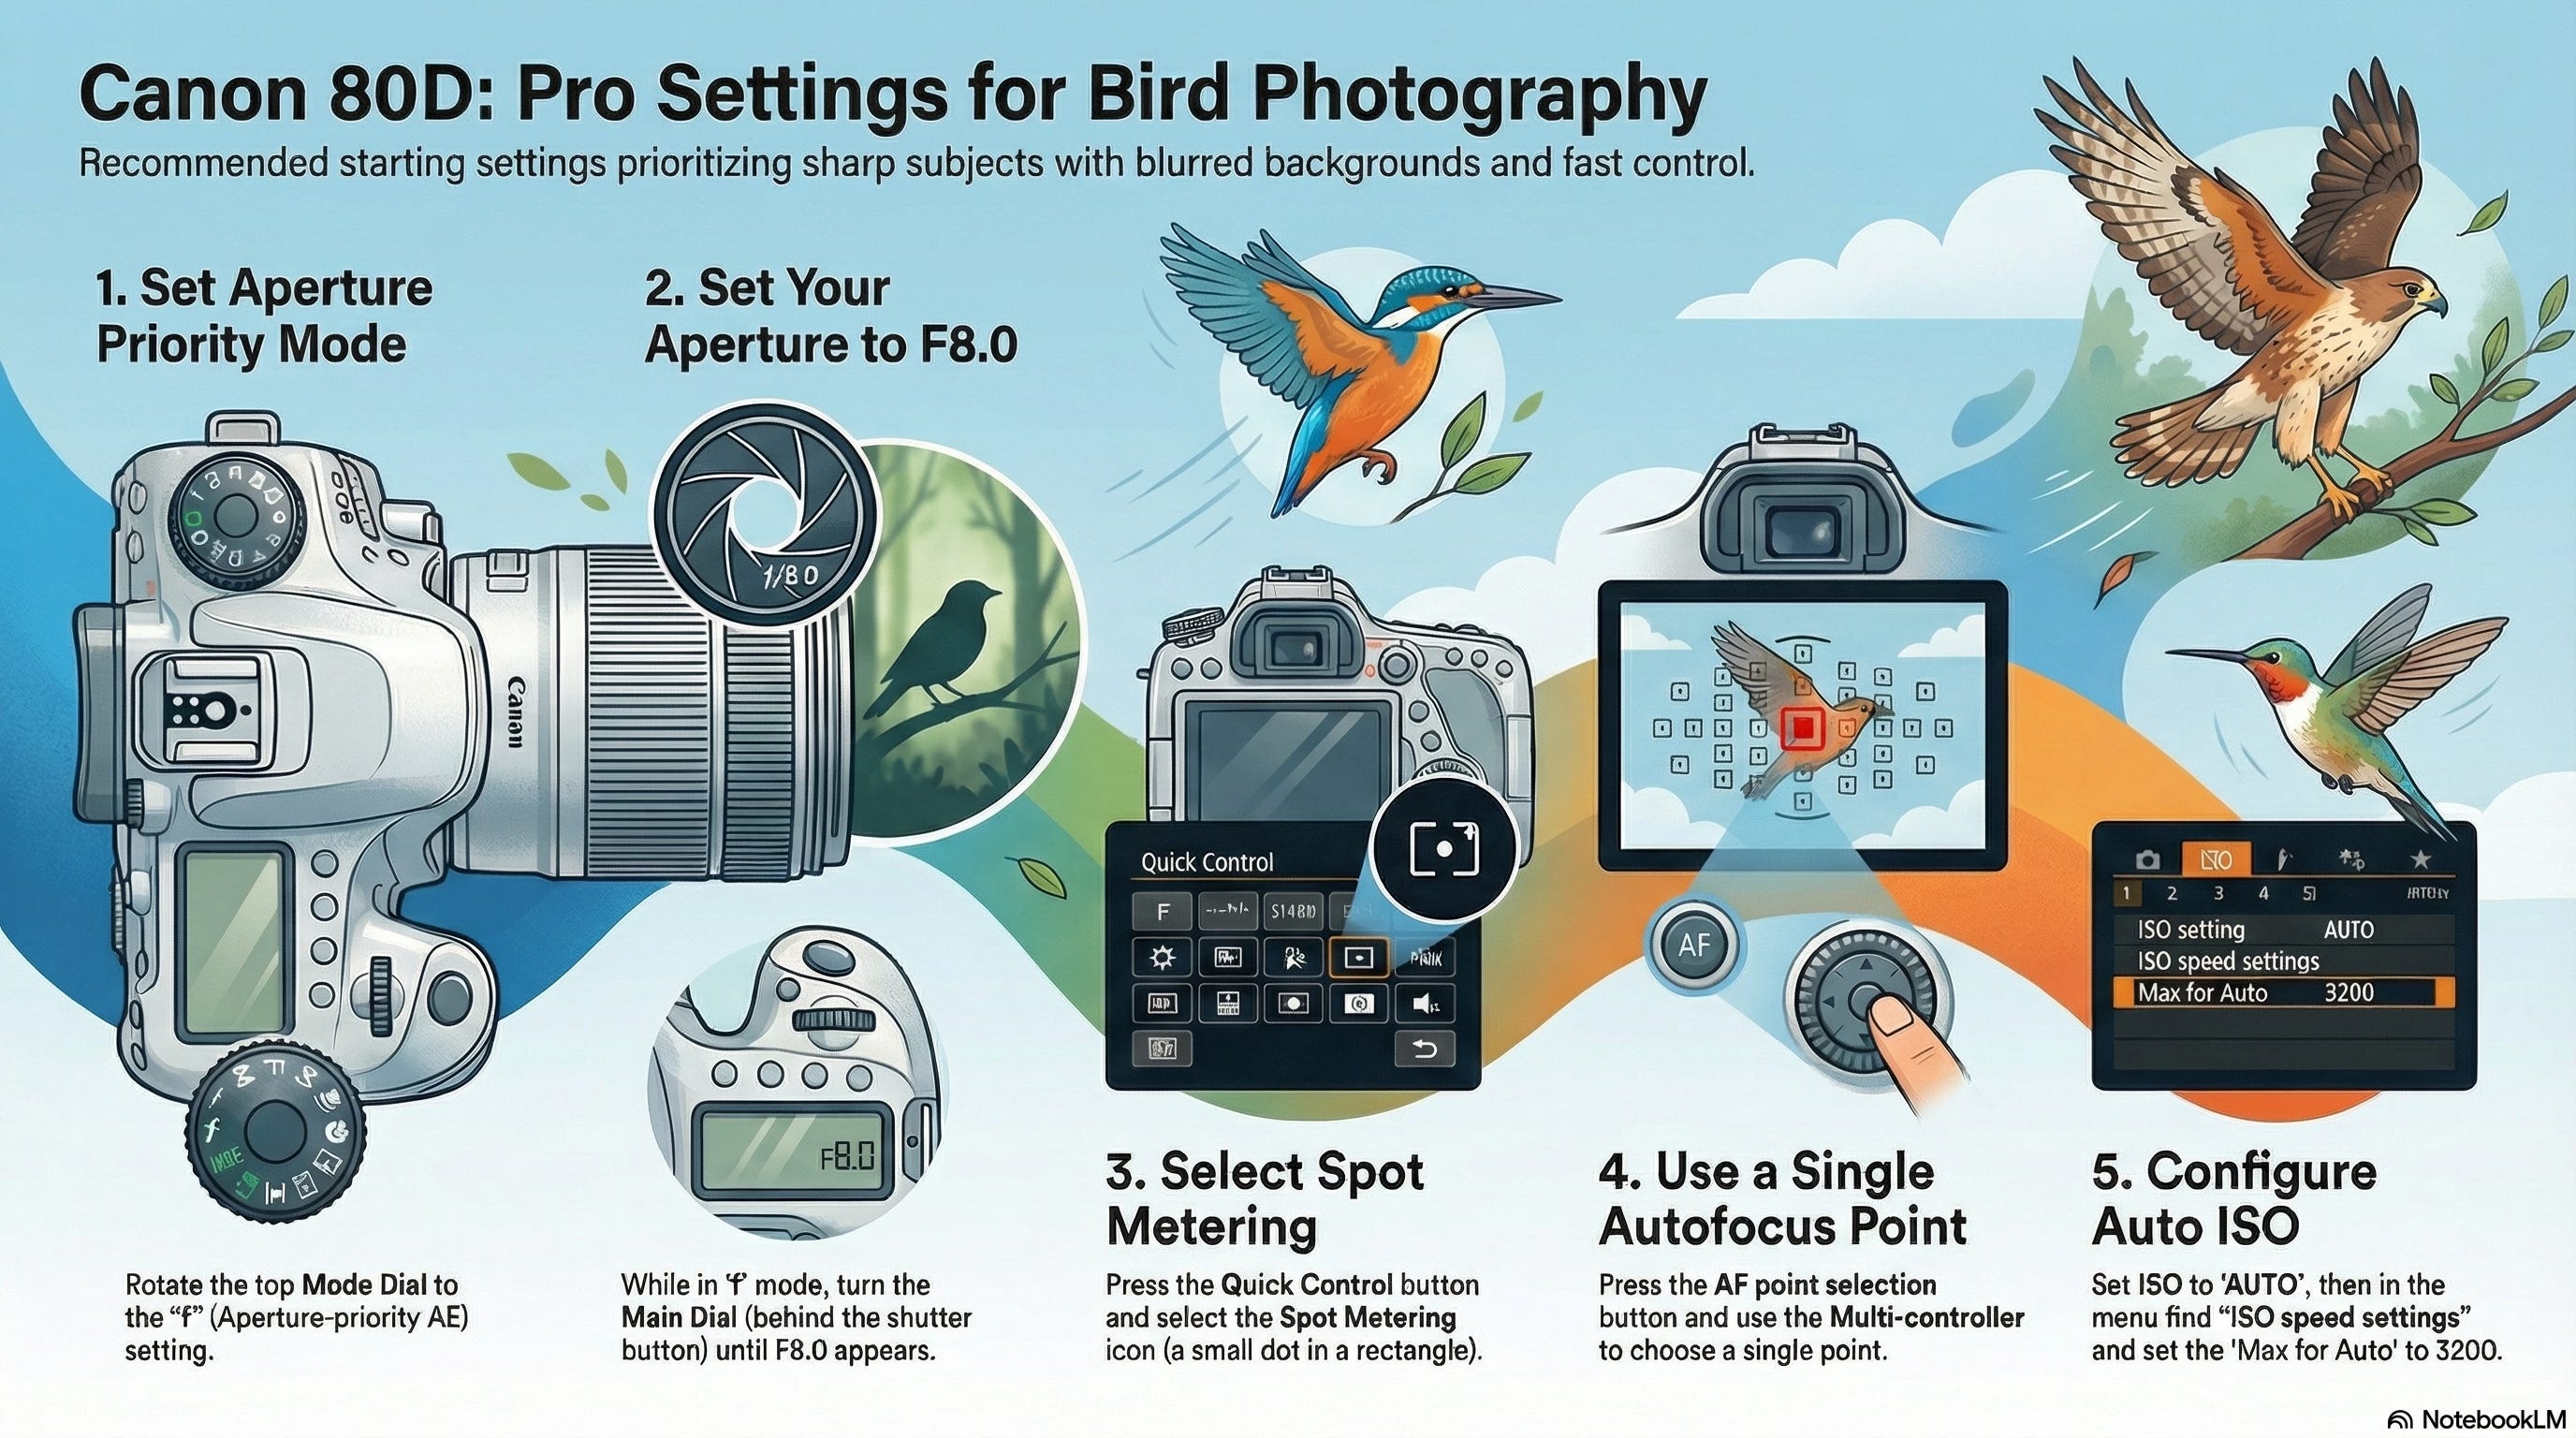
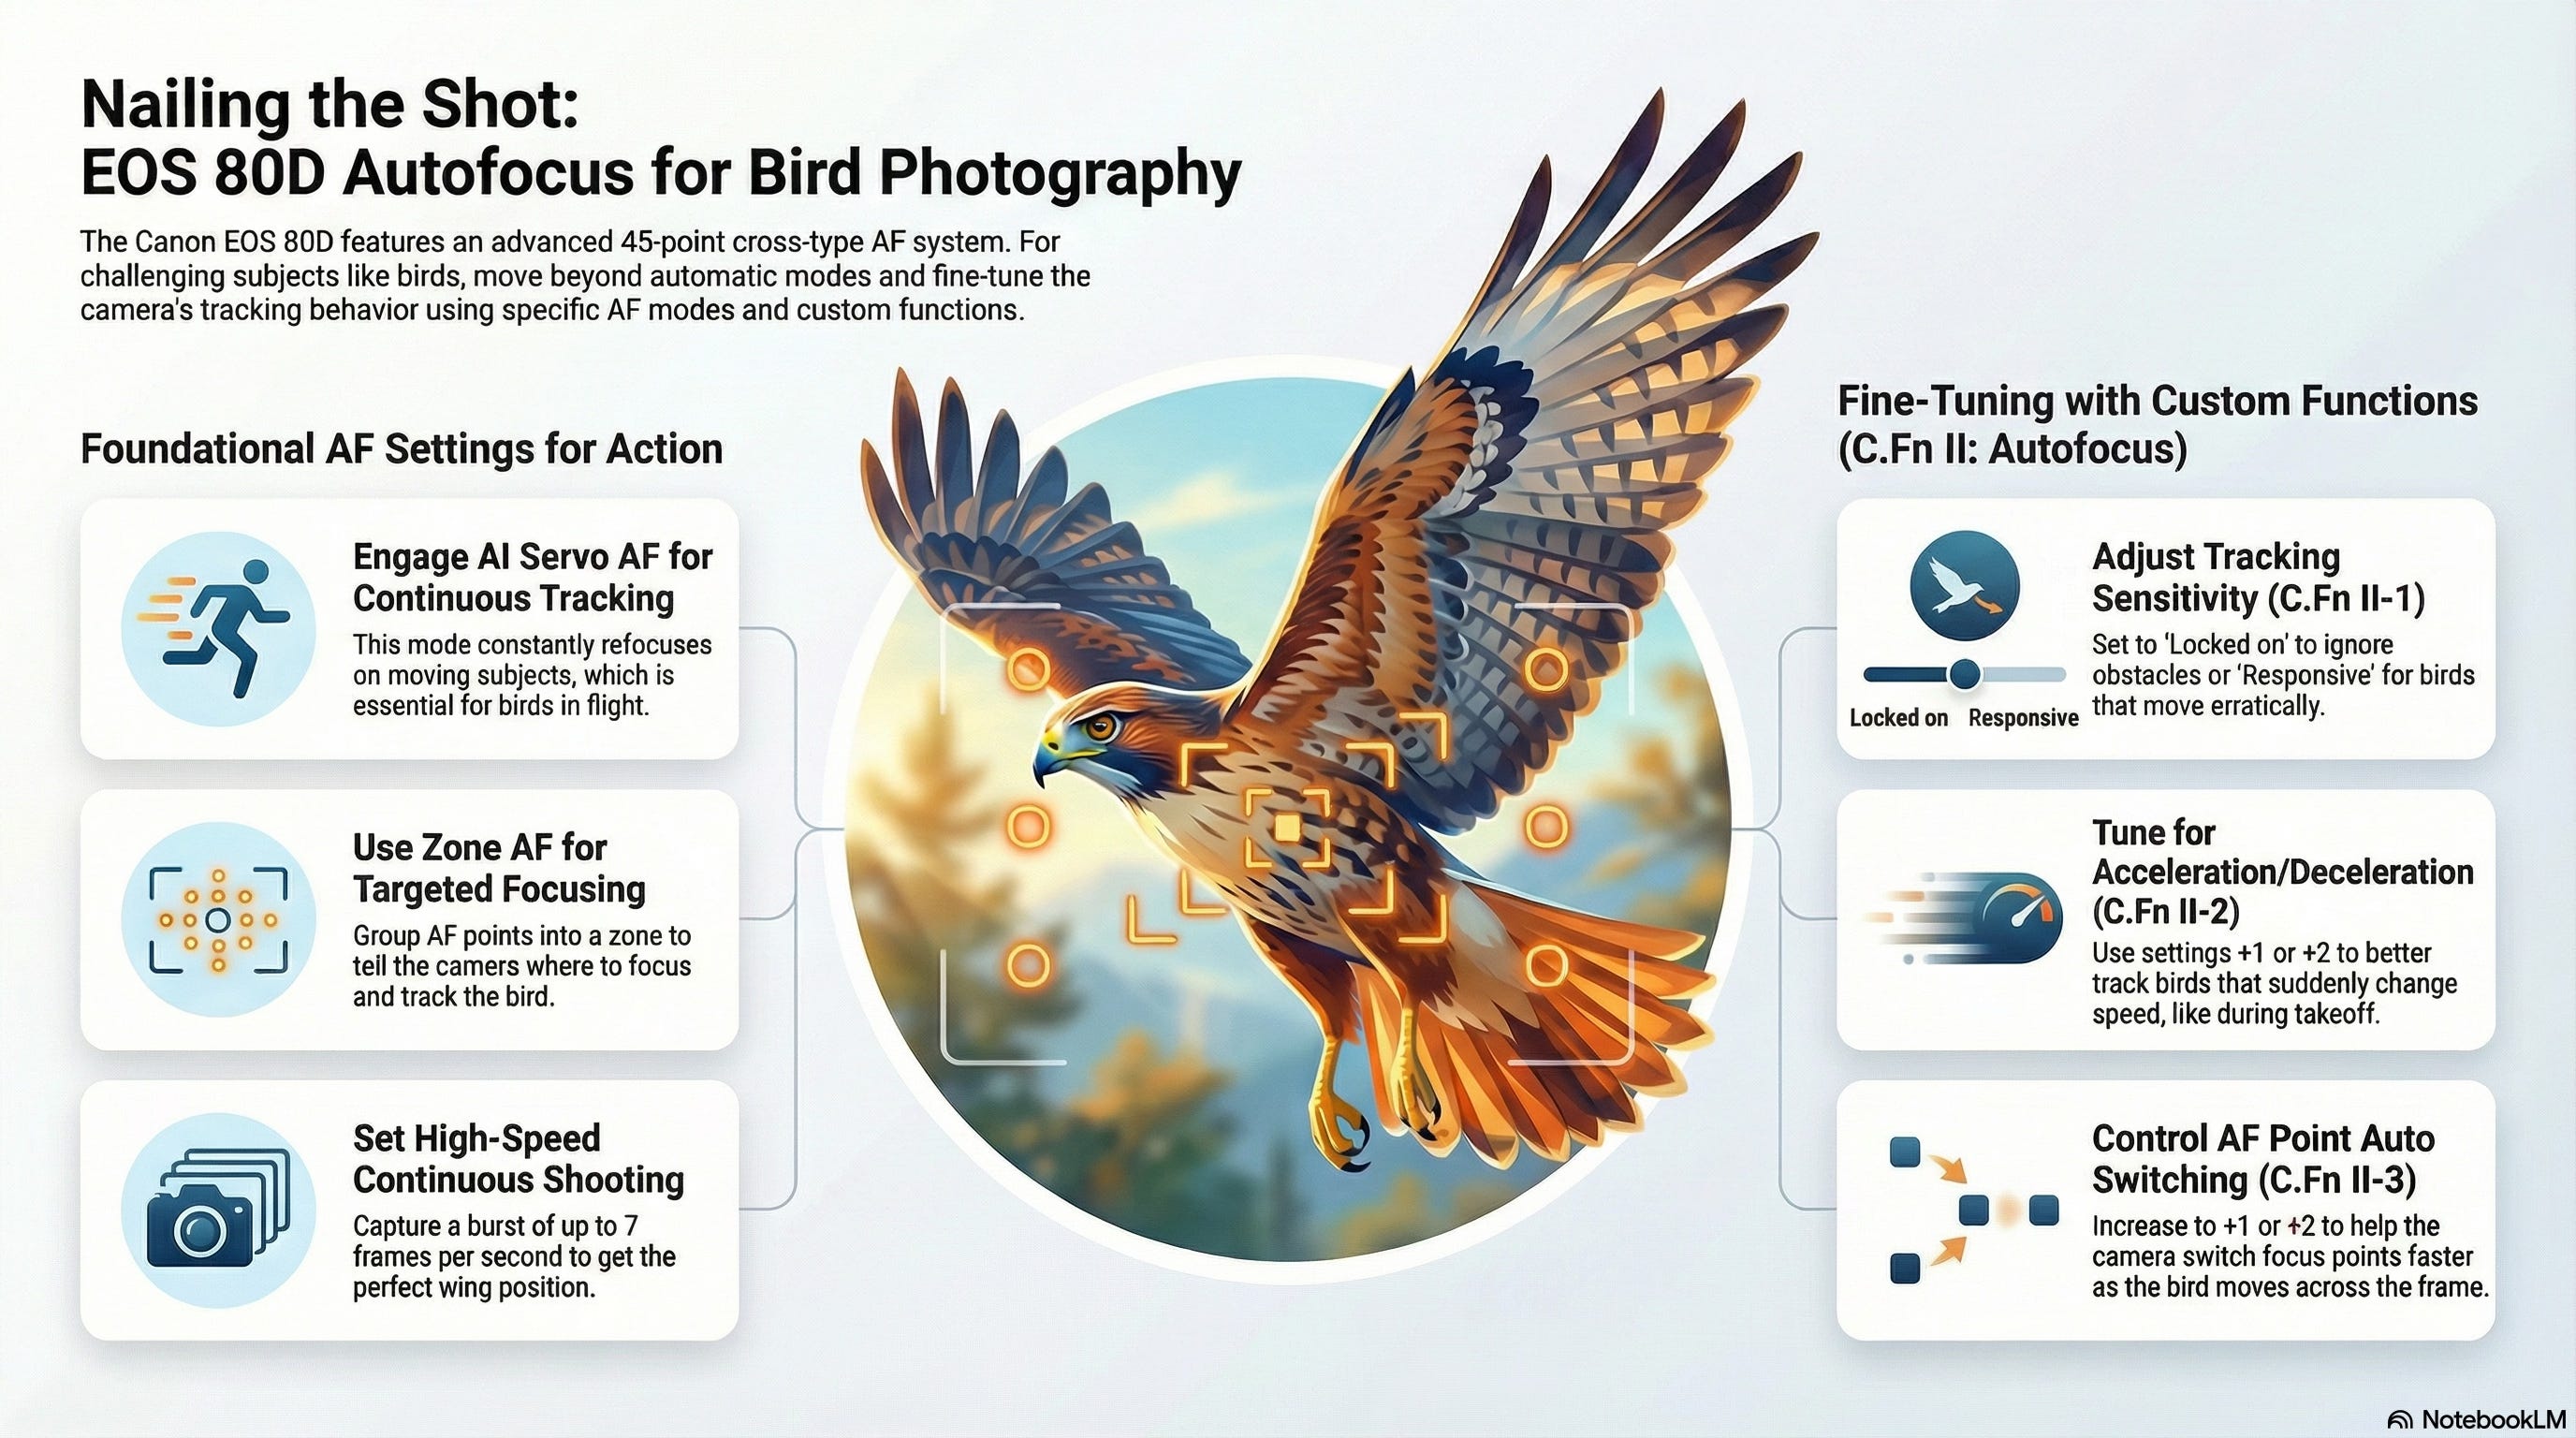
If you’re planning to photograph birds more in the open, or especially in flight, we’ll make some slight adjustments to take advantage of the autofocus capabilities of modern cameras …
I’d also switch to either evaluative or partial metering (depending on how much potential backlighting you expect).


I know this may sound like sacrilege to some photographers, but try to capture most birds (whether flying or sitting still) in the center of your frame.
Composition is important. But with the big sensors on modern cameras, most images can be (pretty extensively) cropped in post-processing and still look good even if you print them as a large canvas or something.
Lens Choice
I’ve captured some nice bird pictures with my Canon 70-200 F4L. I’ve even gotten a few keepers with my Tamron 90mm Macro. On the flip side, I don’t think I’ve ever taken a bird picture with my phone that was worth sharing.
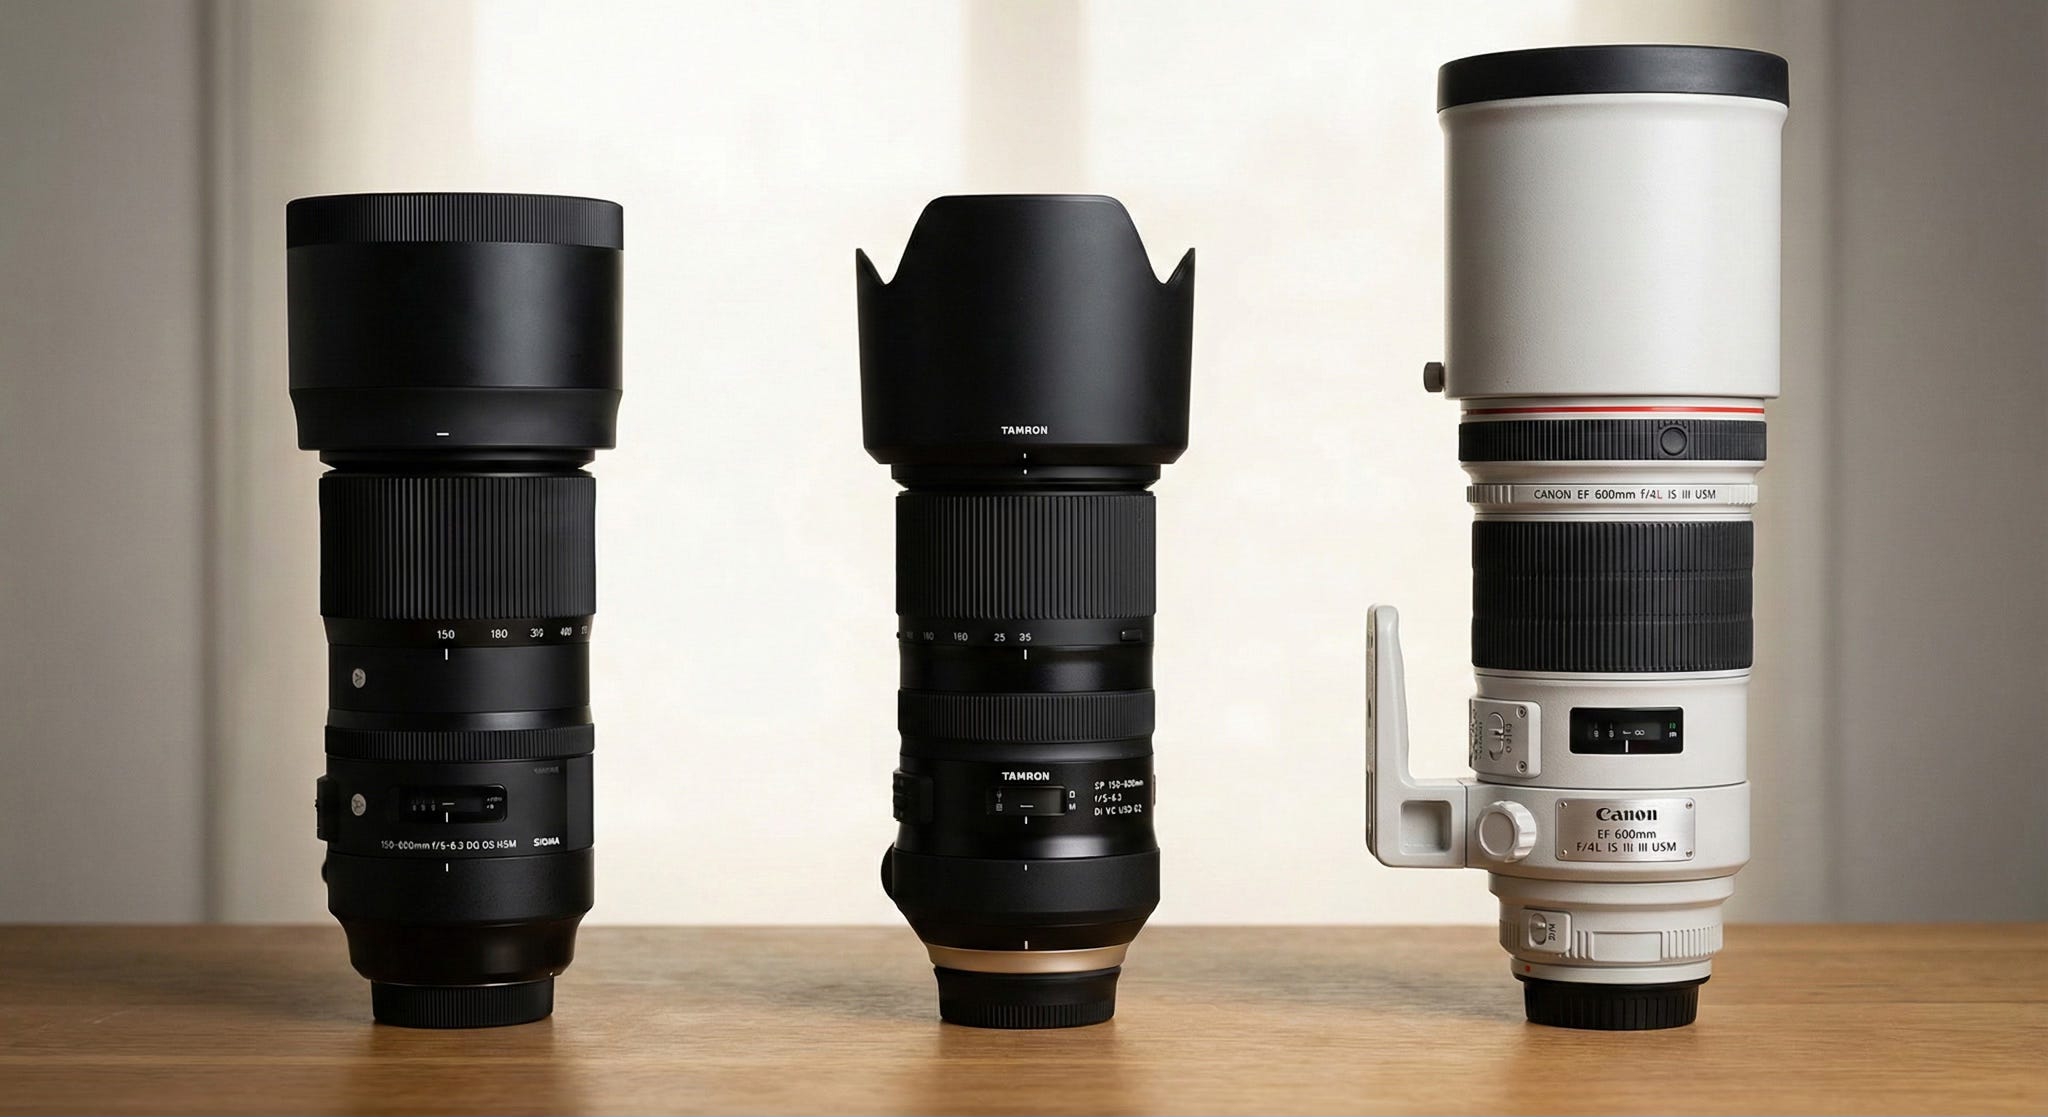
The reality is, you’re going to want a 600mm lens for capturing images of birds and most other wildlife. The Sigma (which I own) and the Tamron 150-600s both capture great images. In my dreams I would be able to get that Canon 600mm F4L. But it costs more than I paid for the 10 year old Jeep we bought this past spring. I might have to wait for all the kids to move out before I can even potentially justify that one.
Whichever big lens you get, you should pair it with a good monopod.
If you’re planning to move around at all while looking for birds, a monopod will probably work better than a tripod … and with IS engaged, it should provide more than enough extra stability for crisp, sharp images.
I will say one last thing about capturing bird images before we move on to editing …
Bird photography is kind of like fishing, in that you’re probably better off picking a good spot and waiting to see what comes along, rather than walking around trying to find them. The birds are aware of you long before you see them.
Editing
I understand that there are plenty of different editing software programs out there. I use Lightroom, so that’s what I’m going to talk about here. This is also going to be pretty basic, and just cover a few things that I do to my photos. If you want more in-depth tutorials on the software itself, I’d recommending checking out someone like Anthony Morganti.
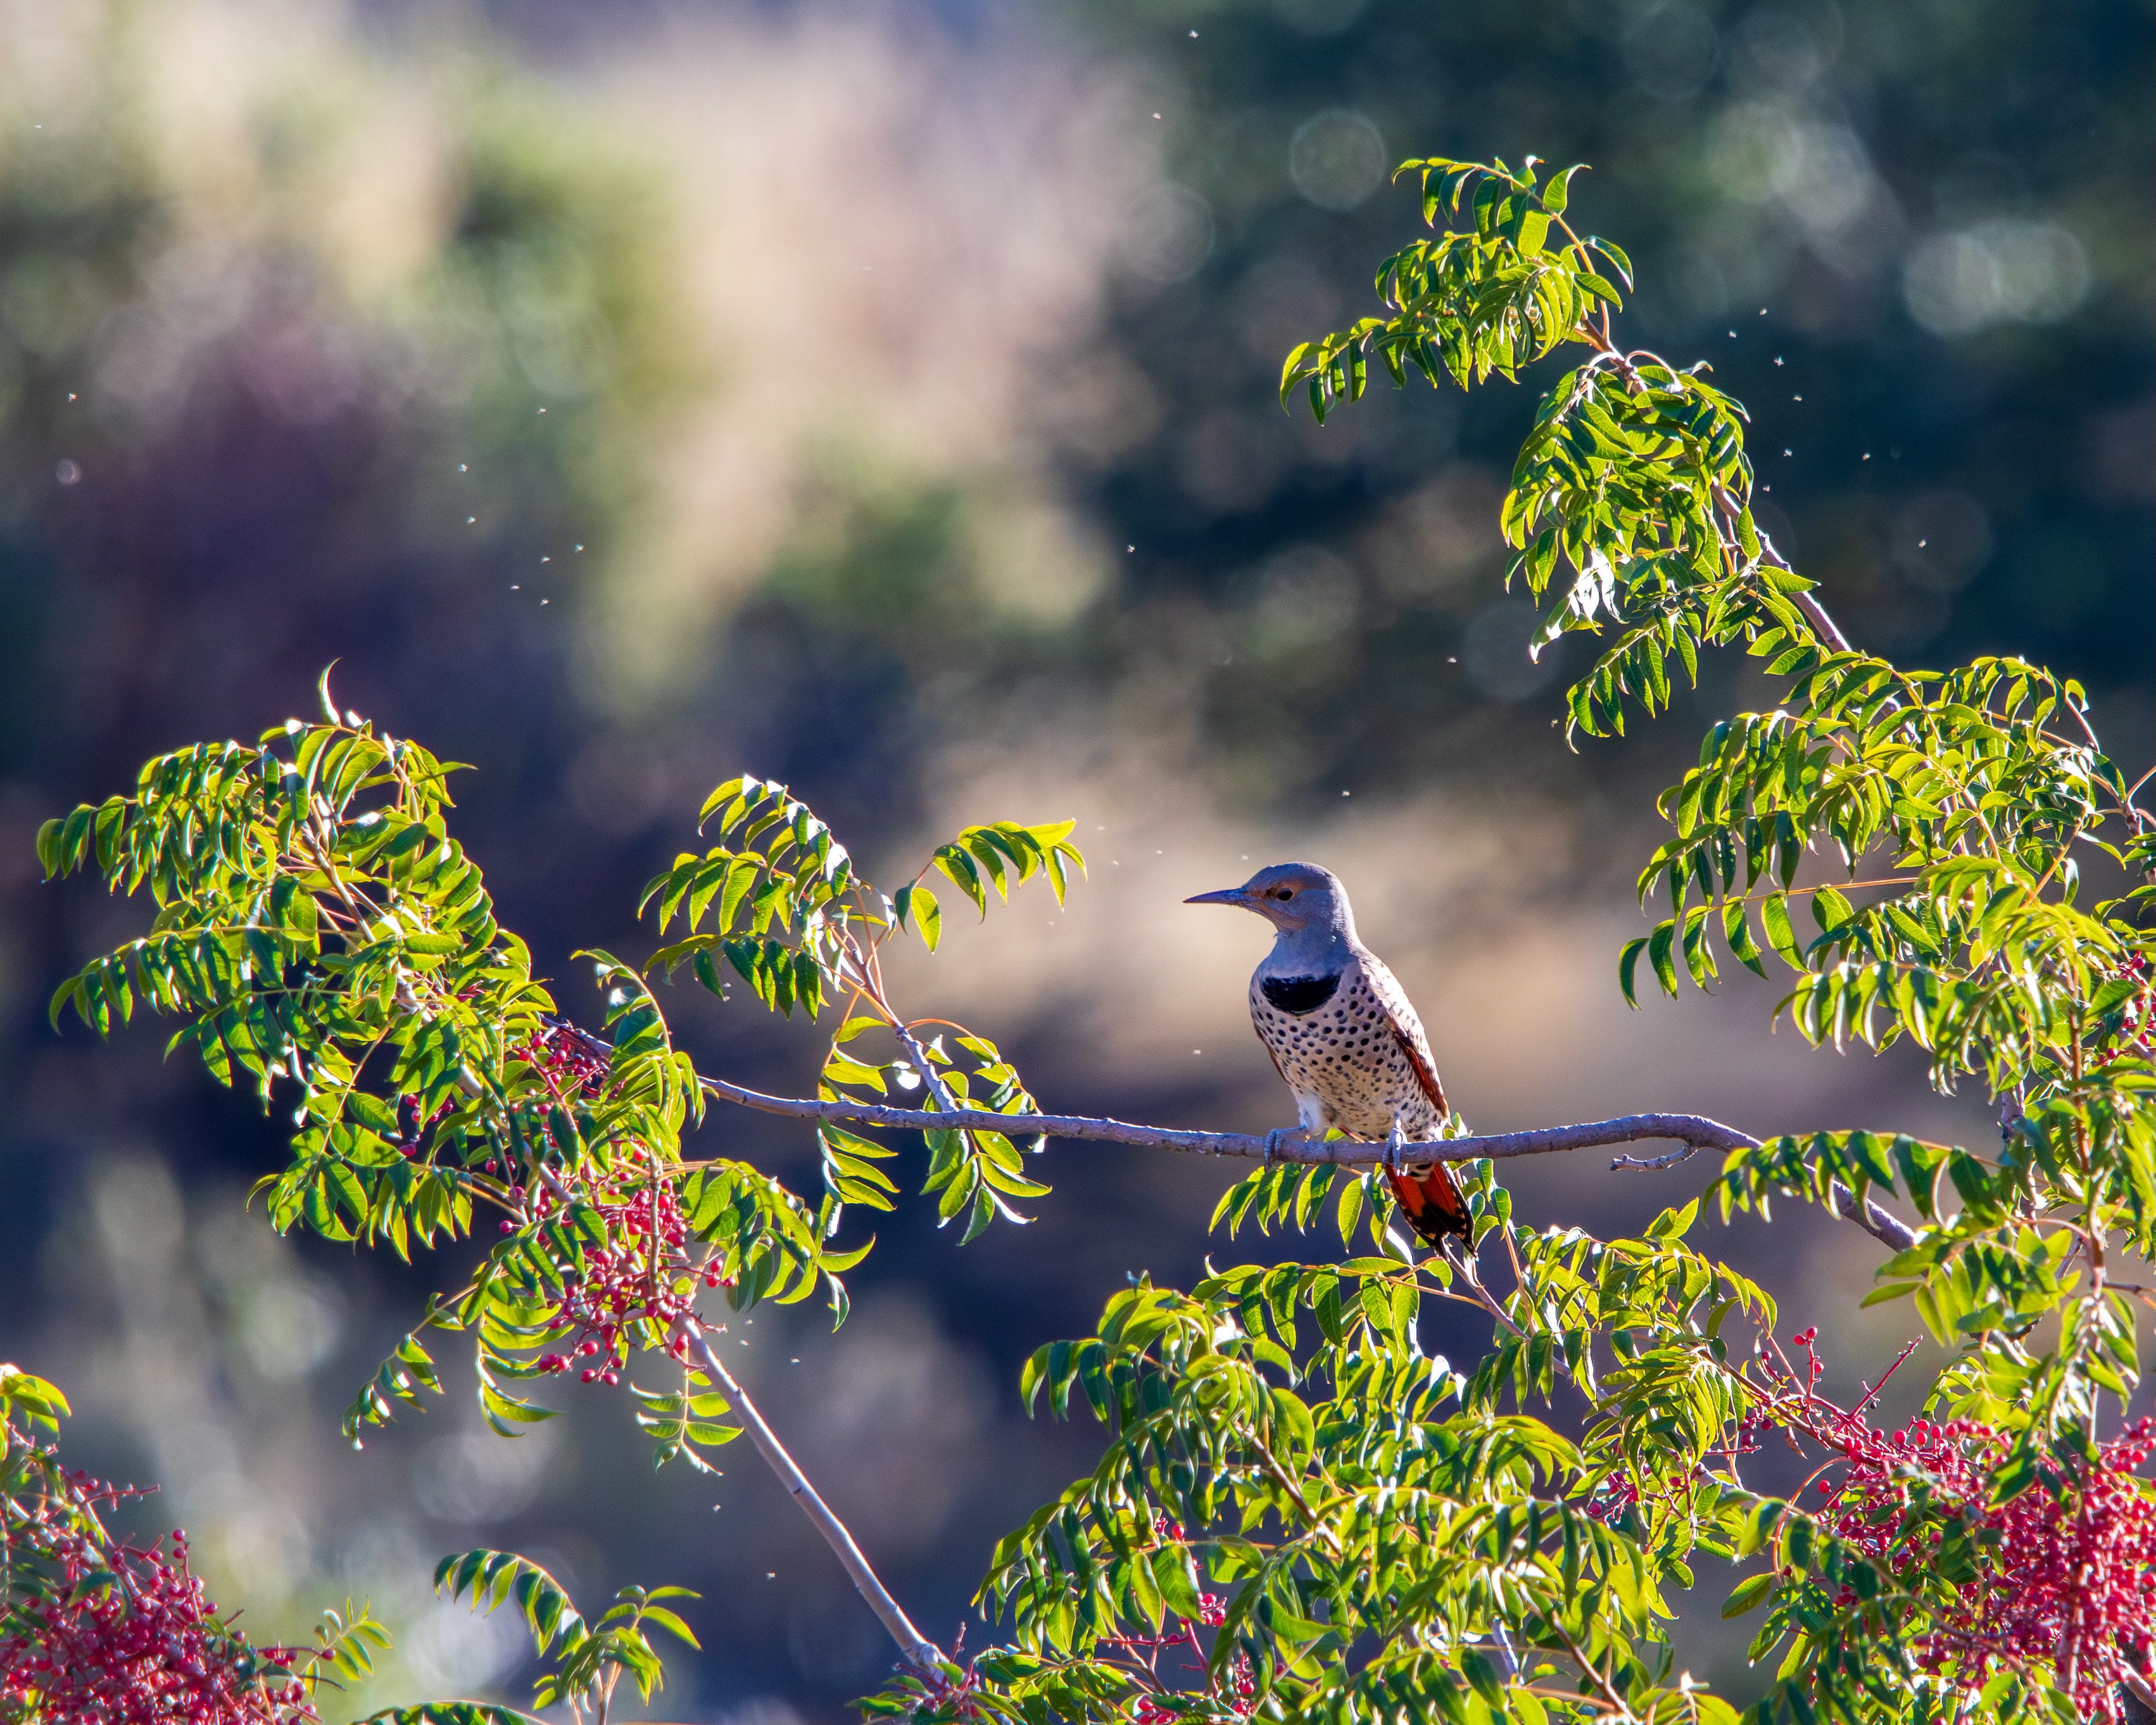
Here’s a relatively recent image that I edited.
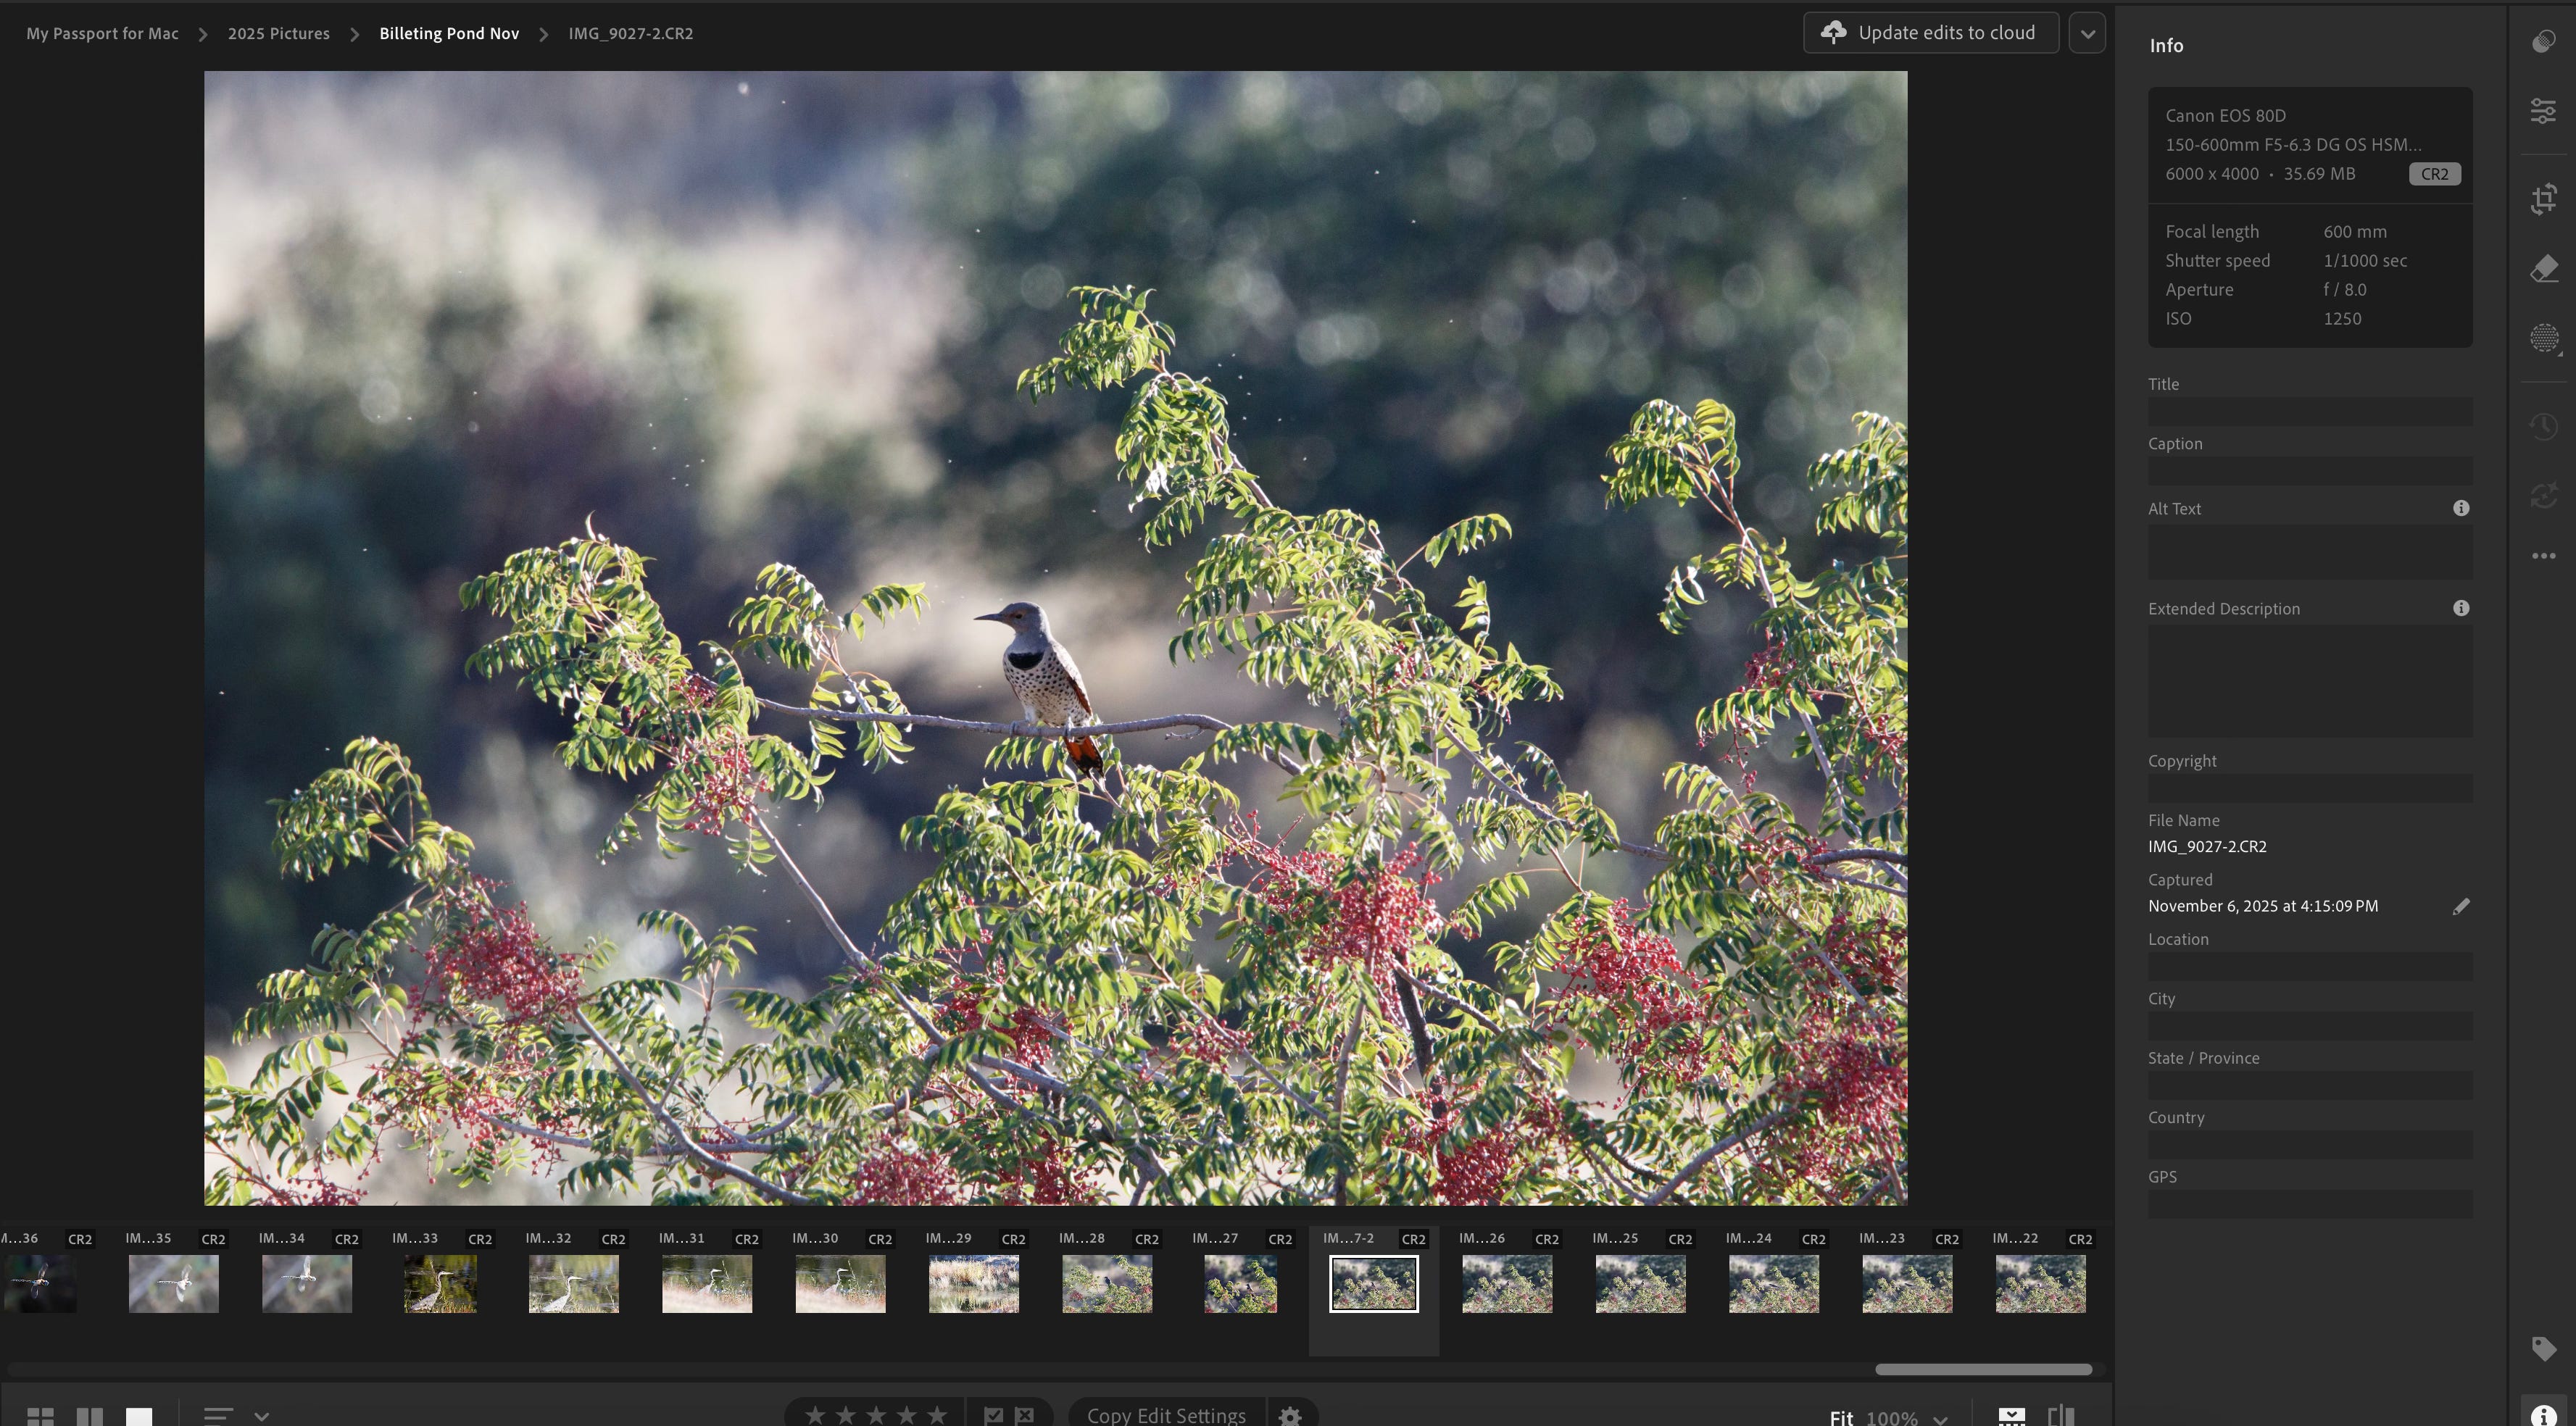
It wasn’t a bad shot just in RAW form. Slightly noisy and a little too backlit. But not bad. Notice (per my advice at the start of this article) that the northern flicker is right in the center of my frame. I can’t see what metering mode I was in, but since this was one of the first pictures I took when I got out of my Jeep that day, there’s a chance that I hadn’t yet switched to Spot Metering … which is why the bird itself is a little underexposed. Ideally I’d prefer the bird itself to be correctly exposed, and work on fixing the other stuff here in Lightroom.
I’m going to show you the final image, then explain the steps down below it. The very first step though is to crop. Composition is important, but for subjects that move around as much and as fast as birds, you’re better off saving it for post-processing. You’re going to miss a lot of shots if you try to compose the prefect frame in camera every time.
The next thing I usually do (and again, I know this will be anathema to many. “serious” photographers) is in the Edit settings, I hit the “Auto” button to see what it looks like. Sometimes it is really bad and I immediately undo it. But you’d be surprised how often it gets pretty close, and the image just needs a few more little tweaks. That was the case with this image.
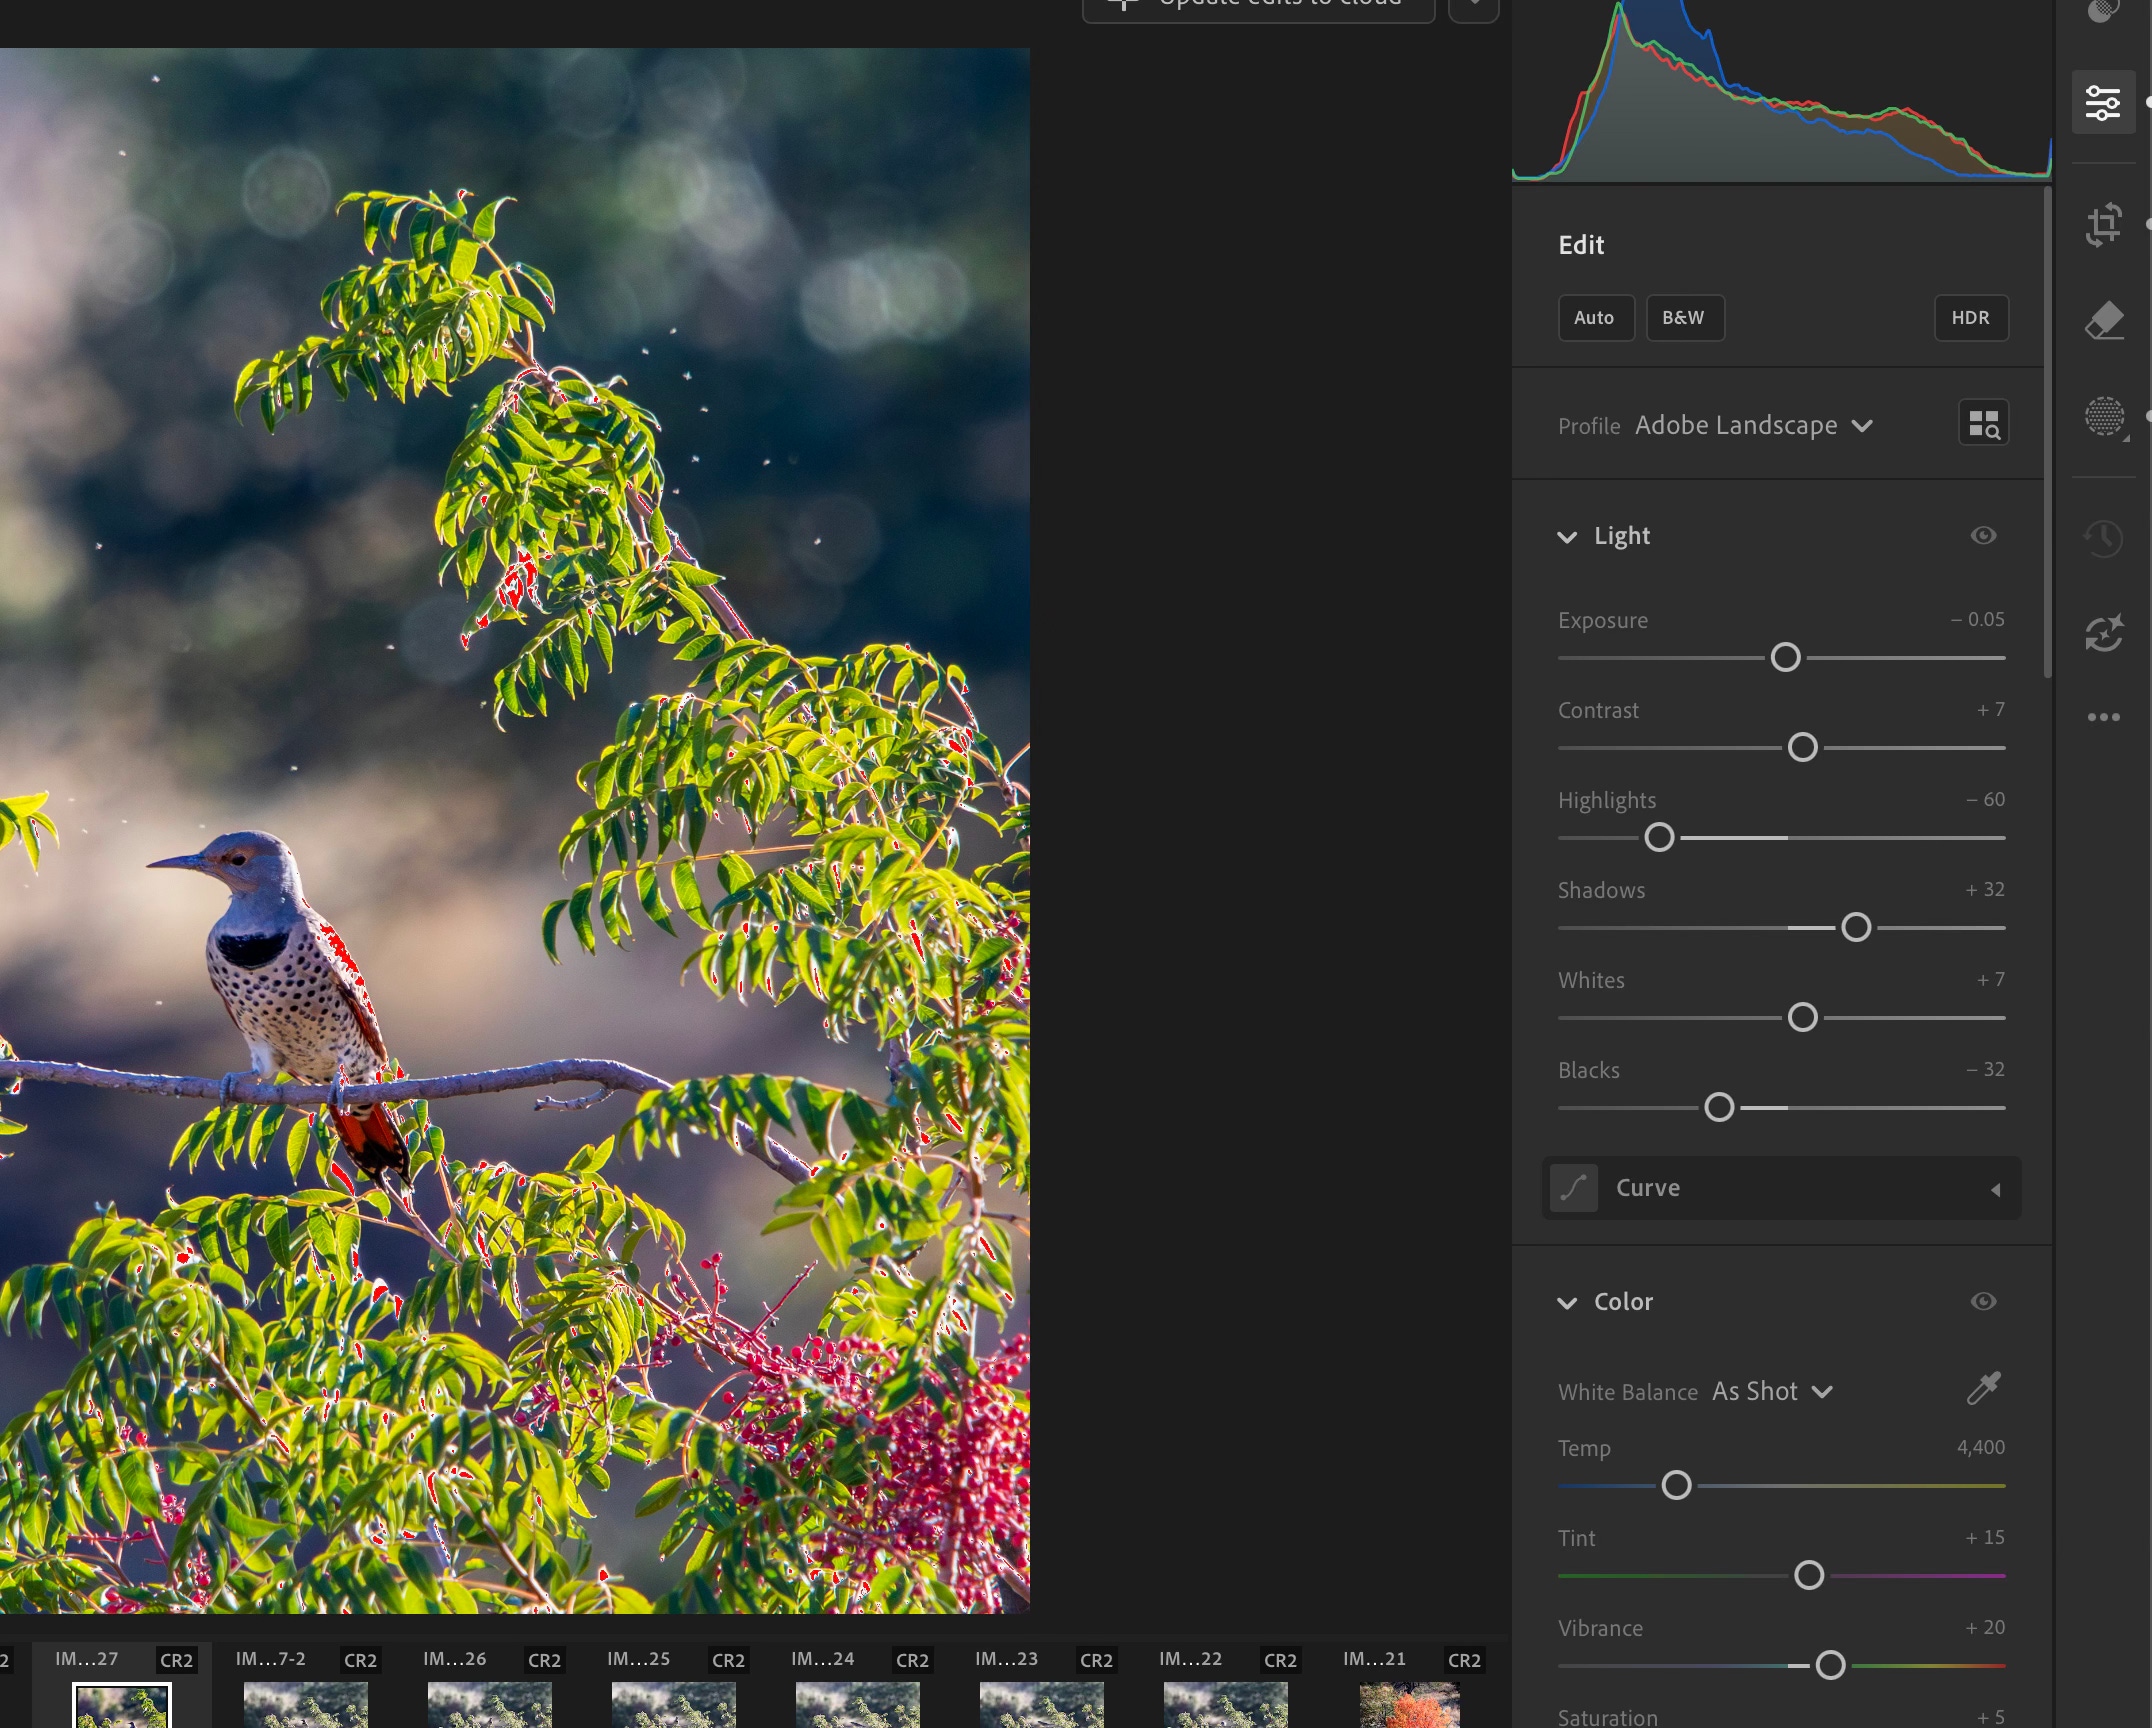
I changed the profile from “Camera Standard” to “Adobe Landscape”, and I might have made a few more slight adjustments to the Highlights, Shadows, Whites, and Blacks (note, if I didn’t like the auto version, these are the main sliders, along with Vibrance, that I would adjust manually).
Once I got the overall image looking the way I wanted it, the bird itself was still a little bit underexposed, so I applied a “select subject” mask. The program usually does a pretty good job of selecting just the subject, but if it’s a little off you can use a brush to add or subtract from the mask. I did that with this image.

Once I had the mask in place, I increased the shadows some more, then adjusted the Whites and Blacks to get the contrast I was looking for.
The image was coming together nicely.
Moving down the Edit panel, sometimes I’ll make little tweaks to the White Balance (interestingly “as shot” is usually better than “auto” for most of my images). I will also occasionally adjust specific shades in the Color Mixer module. But I try not to do this every time, as it’s easy to get carried away and end up with an overly unnatural looking final image.
I also don’t usually do much in the Effect menu (same reasoning, it’s too easy to get carried away). I will often add a little vignette though, just because I personally like the look.
Before I bought a used iMac this past summer, I used to do all my Lightroom editing on my Chromebook using the mobile version. Once I started using the full desktop version, I discovered that there is a magic checkbox down in the detail section. It’s call “Denoise”.
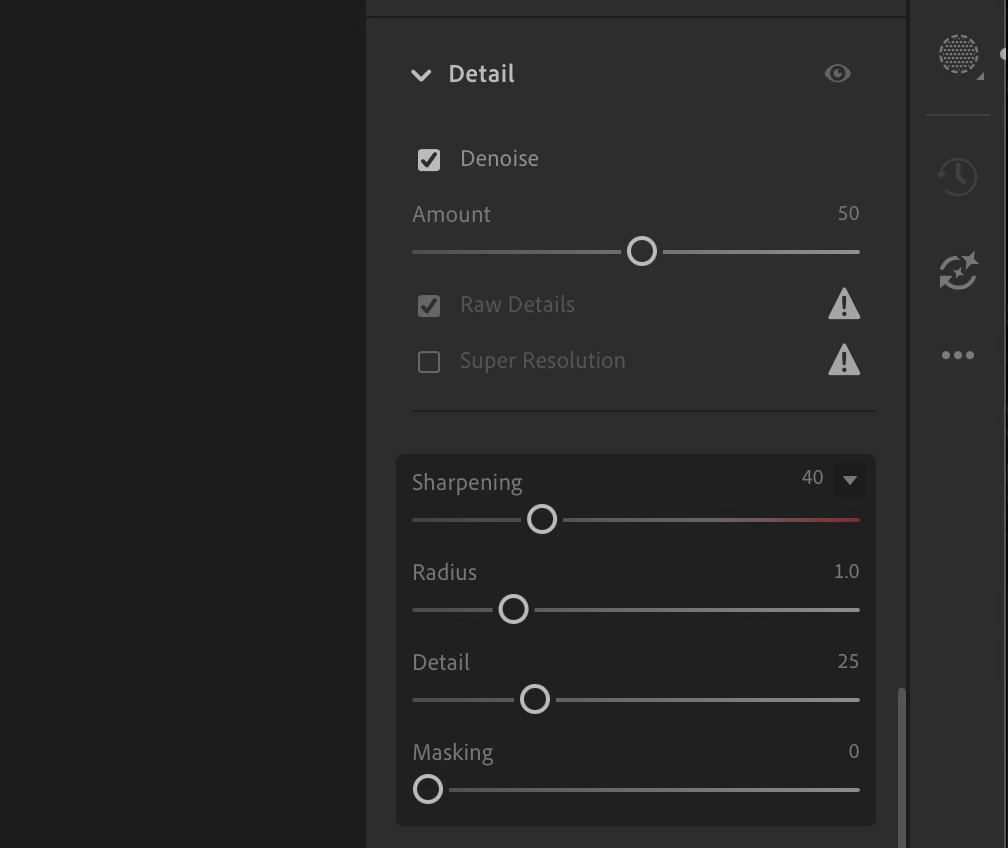
This does use a bit of AI magic, so you might want to avoid it if you are opposed to that sort of thing. But it’s really not altering any of the image subject or really even the scene itself. But it’s very good at removing the noise and sharpening the image. My 80D is about 10 years old, so if I shoot at 3200 ISO, I do get some noticeable noise in some of my images. This checkbox has turned a few that I wouldn’t have even edited a couple of years ago into shots I proudly share now.
I had actually considered purchasing the Topaz noise reduction program, but after trying the native Lightroom solution, I’m not sure it would be much better.
This noise reduction (or alternatively sharping when the ISO was low) is usually my last step before I export a JPG version of the image for sharing.
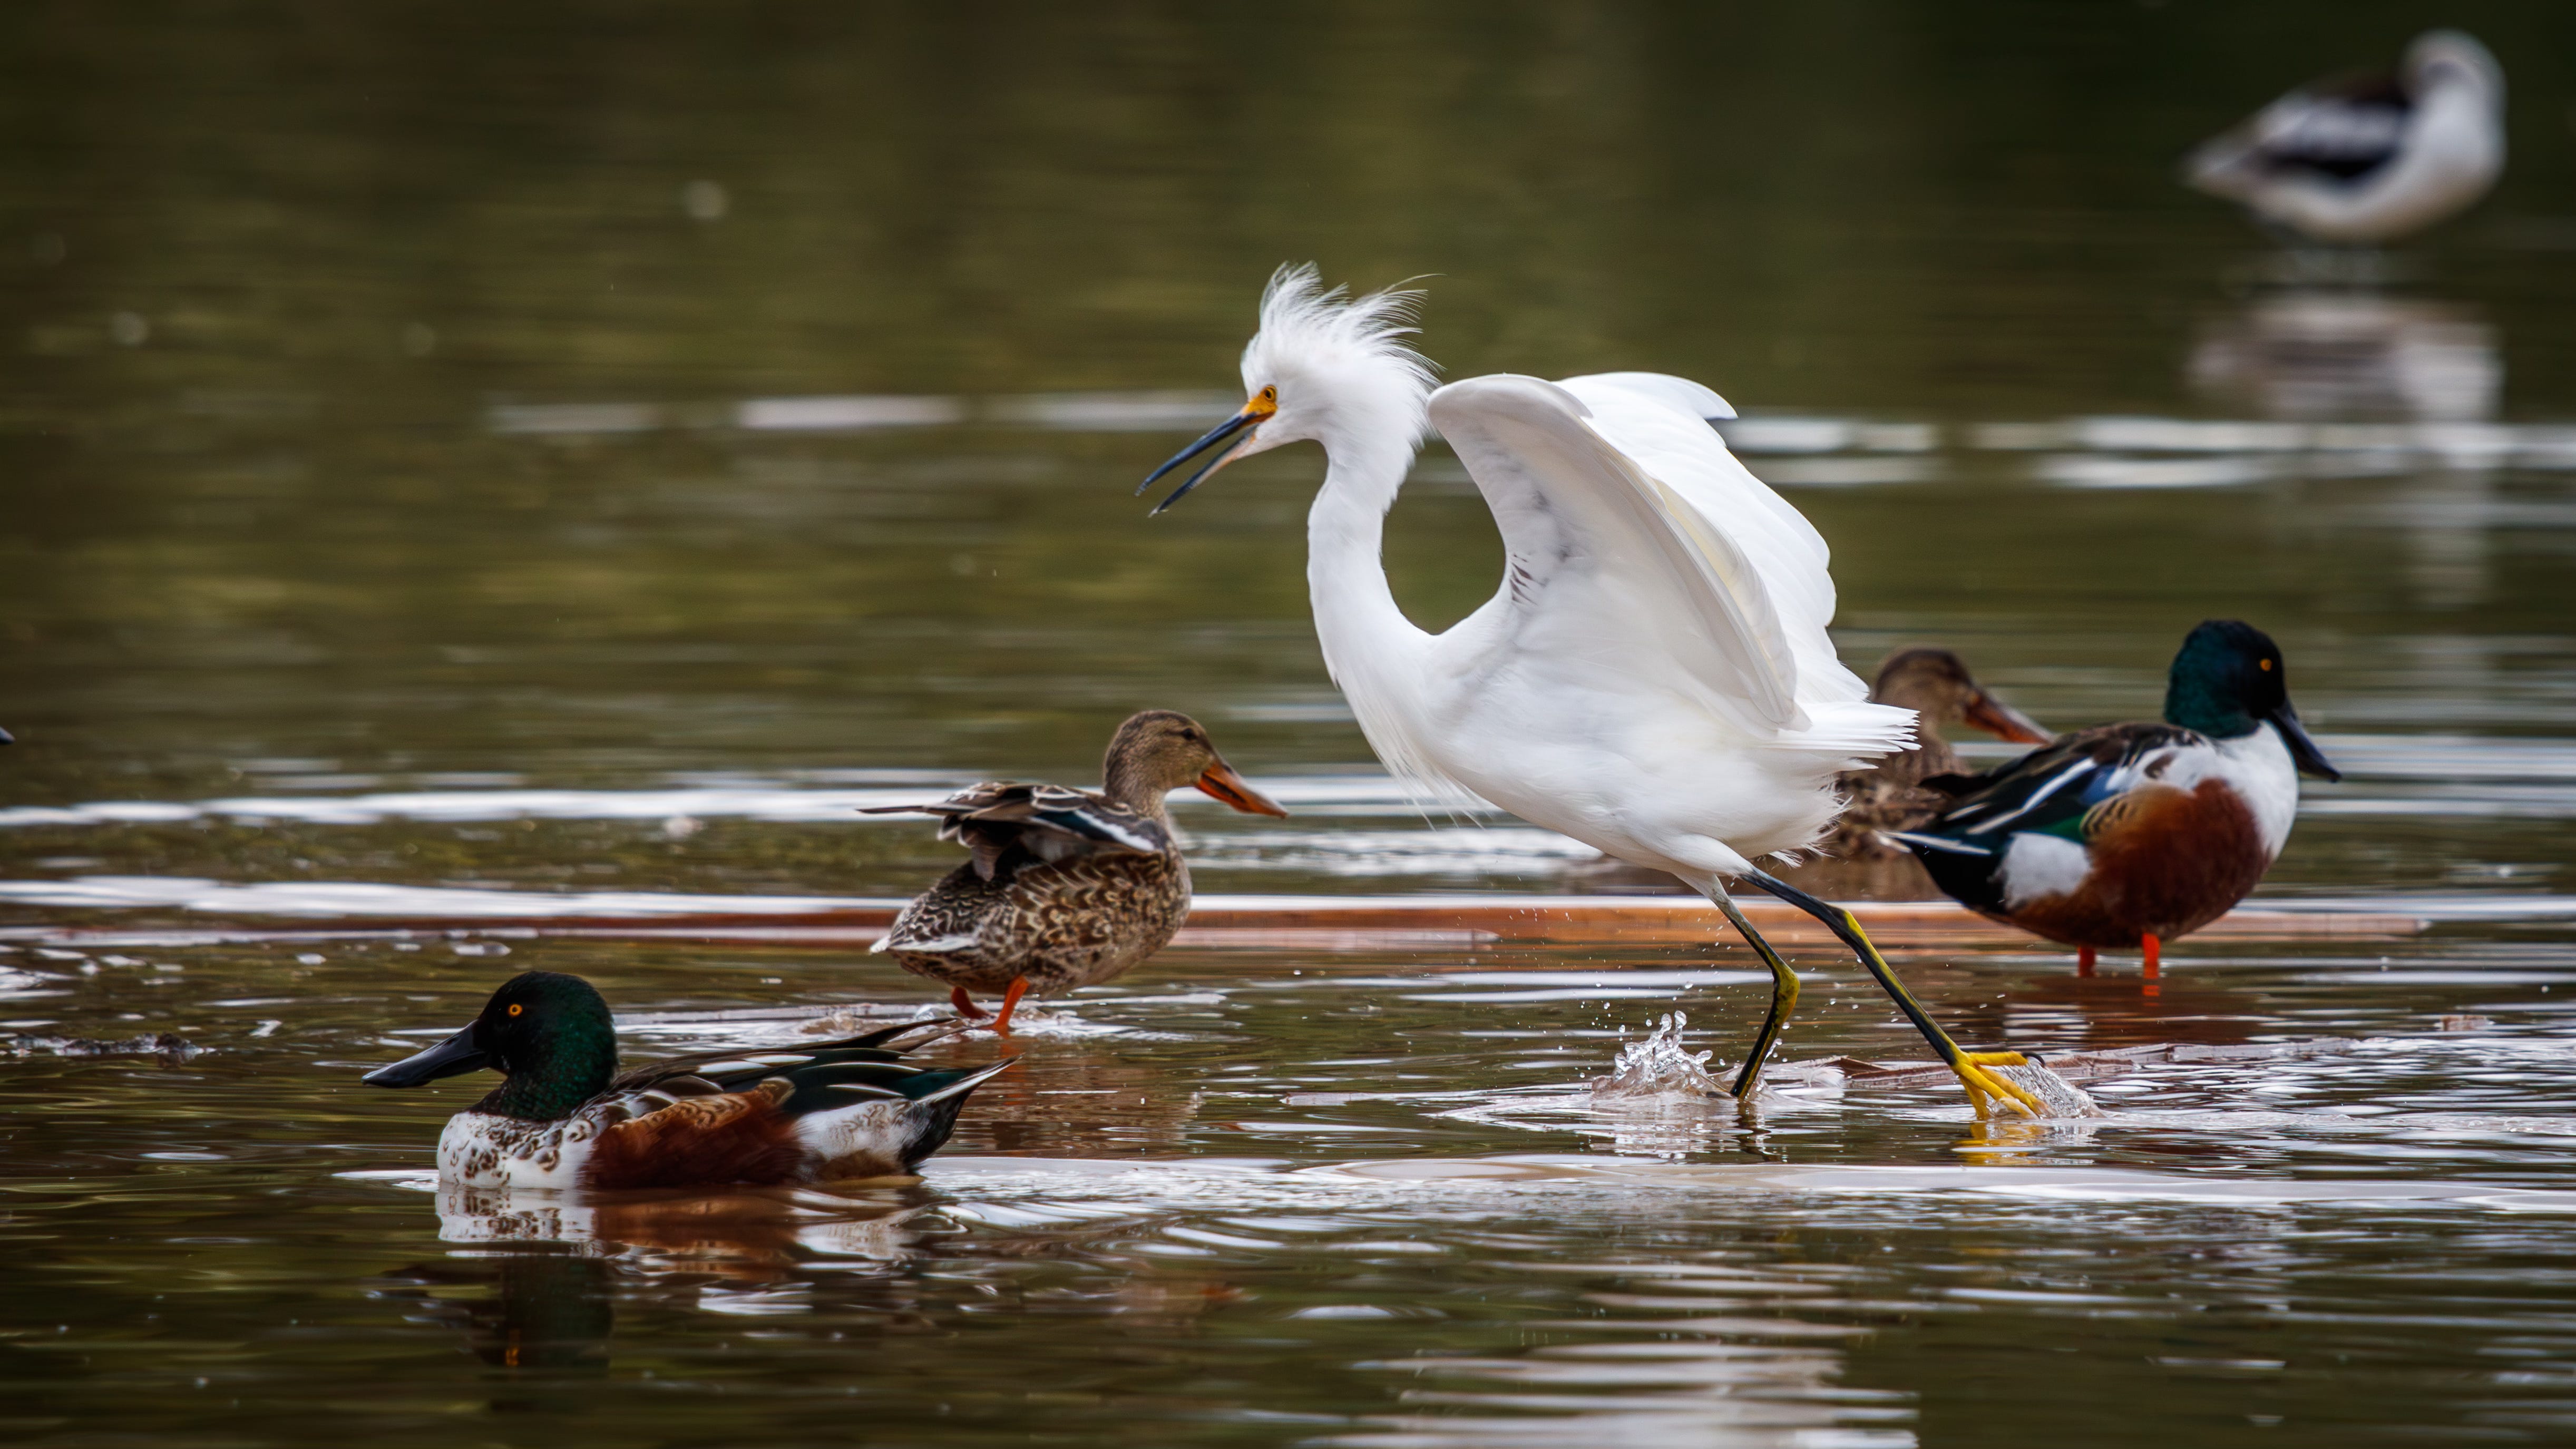
Here are a few more recent bird pictures that were edited with a similar process.

I don’t claim to be any sort of an expert, especially when it comes to editing. But over the years, I’ve learned a few things that work for me. I hope that you’re maybe able to extract a couple of nuggets that you might be able to incorporate into your own process. Please let me know if you do.
Til next time,
Todd
p.s. if you’re not a subscriber yet, I’d love to have your join our little group. If you do already subscribe, thank you! Please consider sharing this post with others:

As someone who’s about to give bird photography a try, I am really, really grateful for this! Thank you, Todd!
This guide is written for my camera, but you can look up all of these settings for yours too, either the old fashioned way by reading your paper manual, or if you have a PDF version you can upload it to Google NotebookLM to ask specific questions without having to search. You can also create these nifty little infographics like I did.